Semester Start-Up Guide

Digital Skills Services
Last Update hace 2 meses
This guide is meant to assist you with the basics of getting your semester’s courses up and running in MyCanvas. We will be looking at the following items:
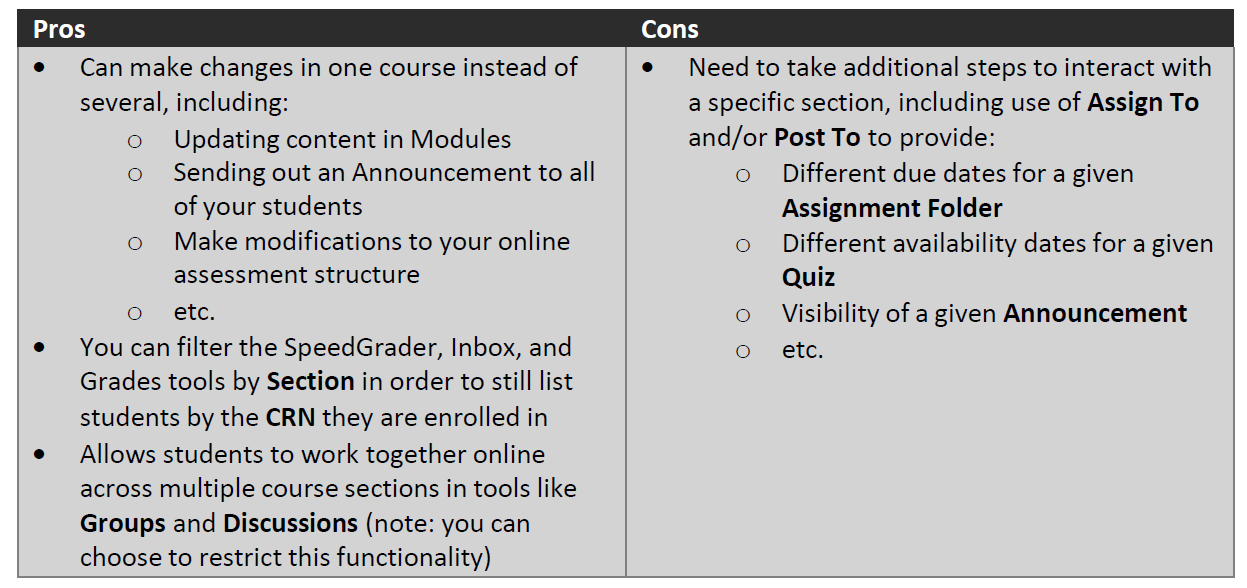
Cross-listing: Pros and Cons of Merging Multiple Courses
Cross-listing is a process that merges together two or more course sections - each identified by a unique Course Registration Number (CRN) and given its own individual course shell in MyCanvas - into one course shell. This merging eases certain elements of course administration.
In MyCanvas, cross-listing does not create a new course shell. Instead, the students are moved from one course into the other, and the name of the destination course will not change.
Whether you choose to cross-list your courses, depends on the following pros and cons:
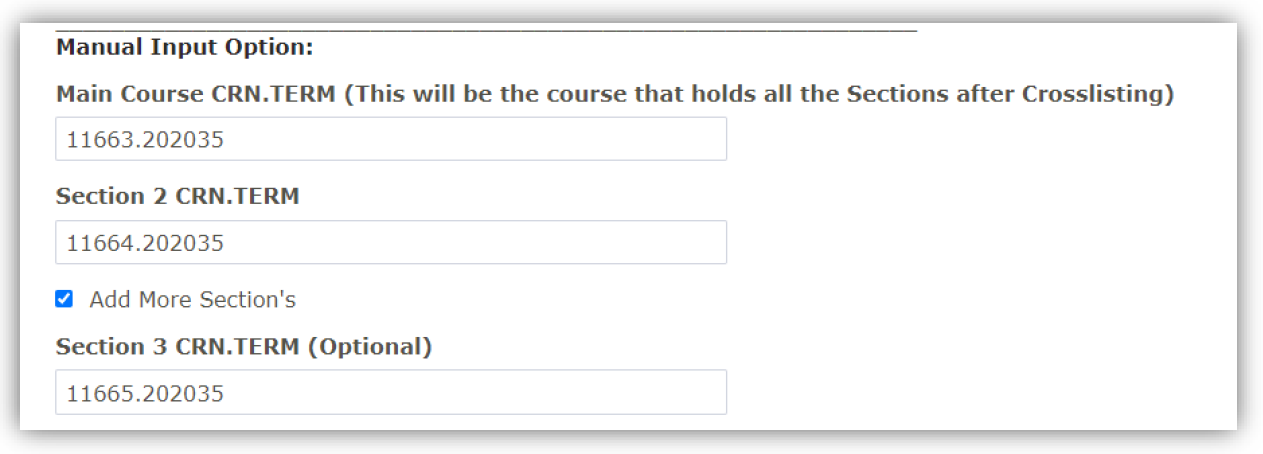
If you decide to cross-list your courses, the following form will need to be completed:
https://www.mohawkcollege.ca/form/mycanvas-help
Completion of this form will automatically submit a ticket to the MyCanvas System Administrator to track this request. One submitted form for each specific cross-listing request is required. Please allow 2- 3 business
days for these requests to be completed.
• We recommend only cross-listing courses with the same name. For example, if you cross-list the students from “Aircraft Maintenance” into “Aircraft Systems,” then both groups of students will be in “Aircraft Systems” and the students who have moved will no longer see “Aircraft Maintenance” in their course list.
• Cross-listing should be done while courses are unpublished. Content is retained within the course, not within the section enrollments, so if a published course is cross-listed, all cross-listed enrollments will lose any associated assignment submissions and grades.
Customize Course Lists to appear on your Dashboard
You can select specific courses as “favourites” to your MyCanvas Dashboard. Only courses from the current semester, a future enrollment, or continuous courses, like a Blueprint or Sandbox, can be favourited.
Click on All Courses, either above your published courses or at the bottom of the Courses section in the
Global Navigation, to find a list of all courses you are enrolled in.
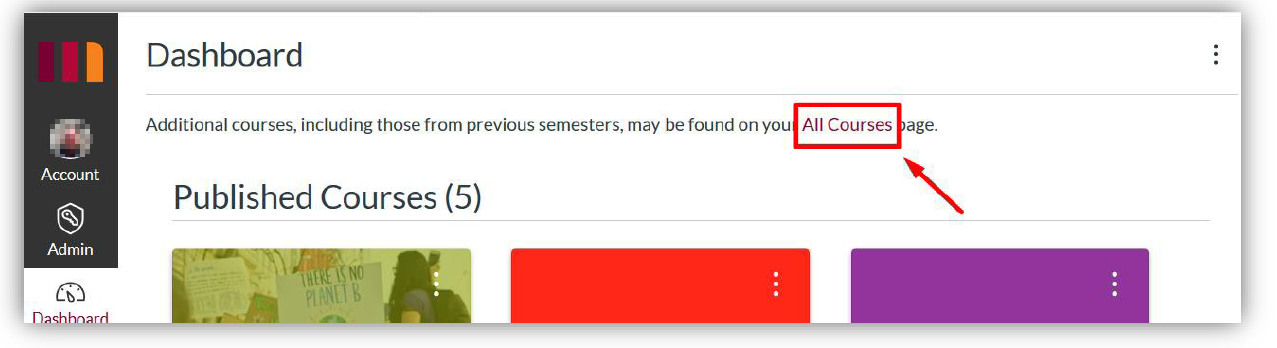
Find the courses you would like to favourite. Courses for the current semester will be in the top section, while those for the up-coming semester will be in the bottom section called Future Enrollments.

Further details can be found in the following Canvas Guide:
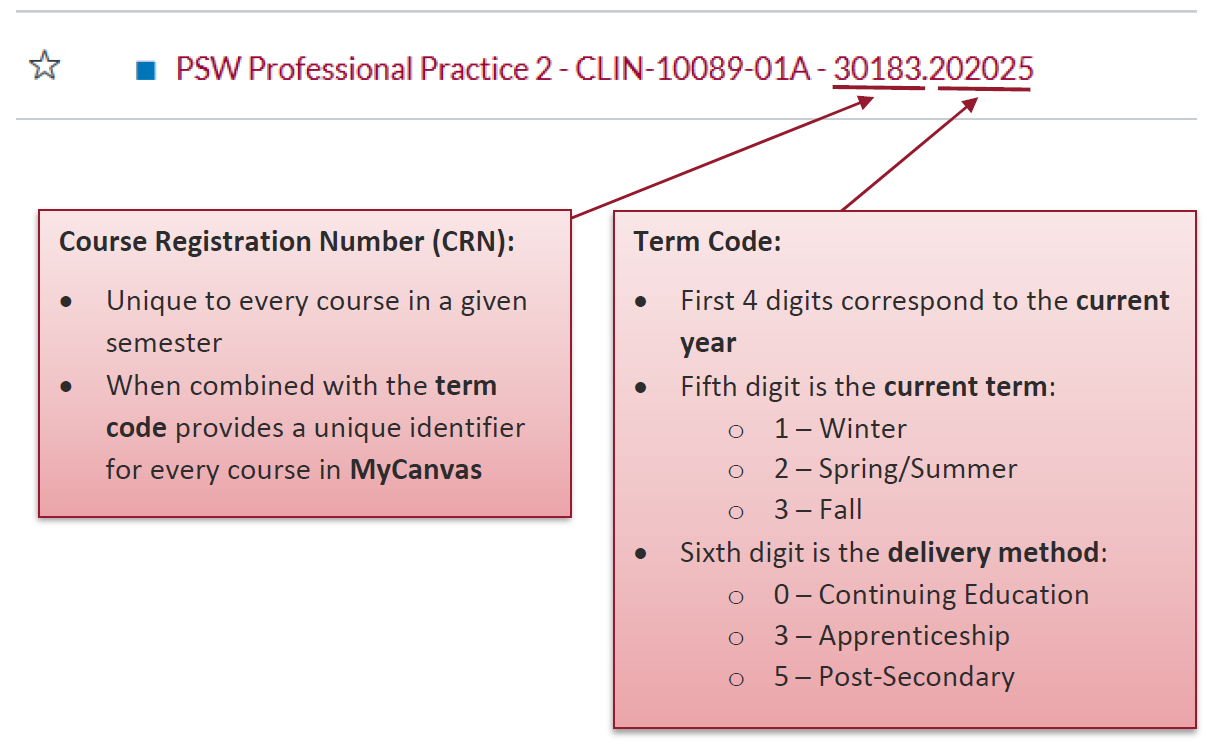
Course Registration Number (CRN) and Term Code
All courses offered each semester are identified by a unique 11 digit number. This is the easiest way to identify a specific course in a given semester.
Copying Content From a Blueprint/Prior Offering to a Current Course
The quickest way to get your new courses populated with all the required content, online assessments, gradebook structure, etc. is to copy such materials from either:
The Blueprint for that course offering:
- A blueprint is a development space where the course lead and any other instructors designing or delivering the course are enrolled
- It is functionally the same as a regular course shell in MyCanvas, with the noted difference that it is not tied to a semester and students are not enrolled in it
- If you are a new instructor, it’s a good idea to inquire within the area in which you teach to see if there is a Blueprint for the course(s) you are teaching
- Once you are enrolled in a Blueprint with either the Teacher or TA role, you can use it as a source for copying
- materials into your semester’s course shells
A prior offering of the course from a previous semester
- Copying from a prior offering of a course as opposed to a Blueprint is normally preferable if:
- A Blueprint does not exist for a given course you are teaching
- You have taught a course previously and personalized it in that prior offering
- A prior offering is more up to date than the Blueprint
Once you know what you wish to use as the source for the copying process, you can then copy all the materials from that course into one of your current course shells by following these steps:
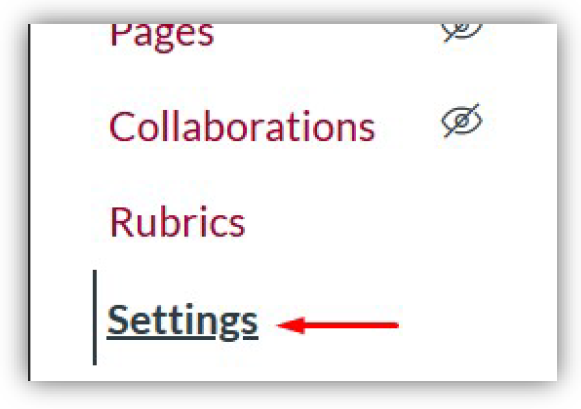
1. Go into one of your current semester’s course shells that you wish to copy content into from either a Blueprint or prior offering. Once there, navigate to the Settings link at the bottom of the course’s Navigation on the left-hand side of the page.
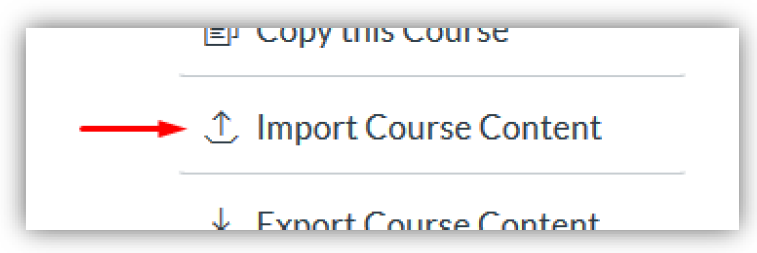
2. Go to the quick links within Settings and select Import Course Content:
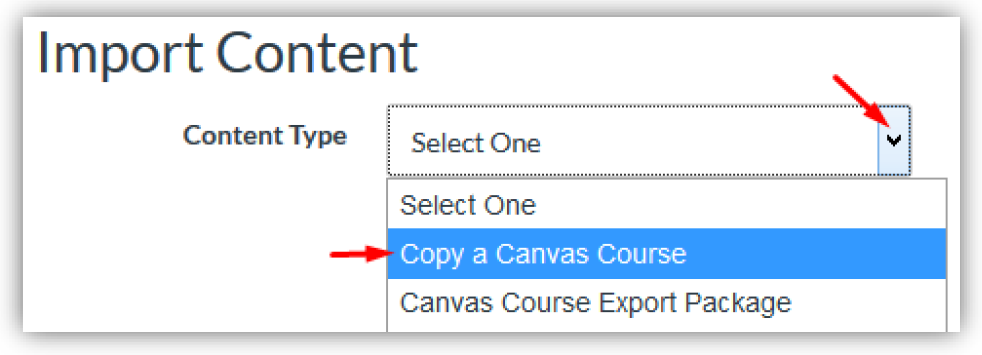
3. Click on the drop-down menu beside Content Type and then select Copy a Canvas Course:
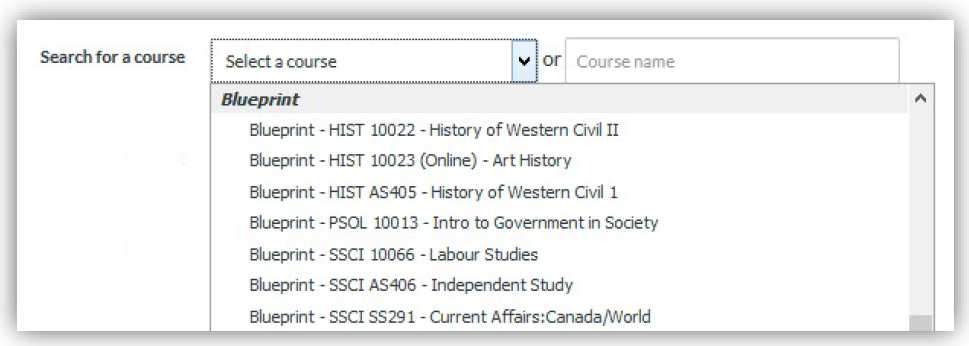
4. If you are planning to copy all the materials from a Blueprint, Sandbox or previous delivery, then beside Search for a course click on the Select a course drop down menu or simply type in the course name in the search box:
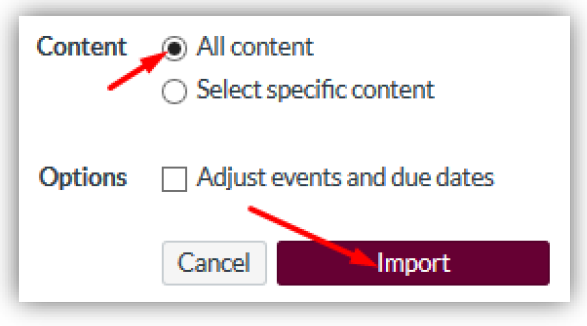
- Select All content and click on the Import button:
6. Under Current Jobs you should see your current import go from Queued to Running and then finally to Completed:

Your course should now be populated with the contents of the course you imported.
Publishing Your Course
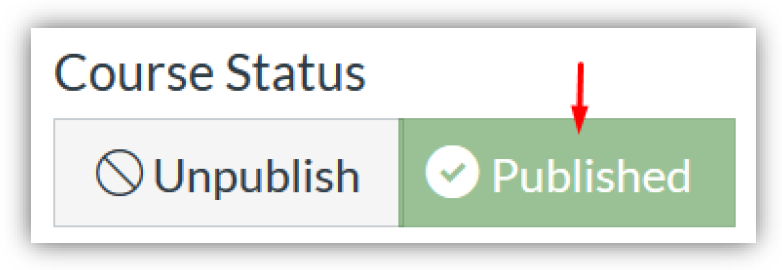
Once you have imported contents into your current semester’s course shell, you will need to Publish the course for it to be accessible to your students. Note that by default, all new semester courses are Unpublished by default. To publish your course go to the Home page and switch the courses status here:
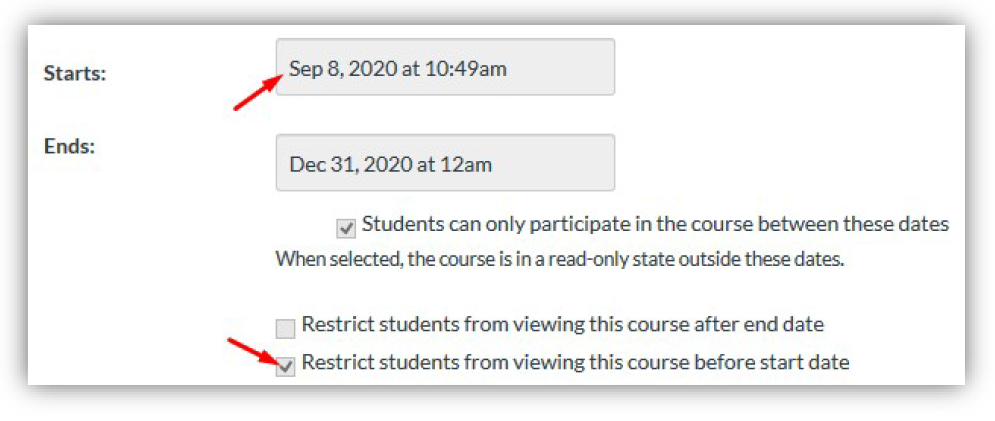
Also note that even when a course is published, it will not be available for students to access until the date specified in the Starts field in Settings has passed:
Updating Dates in Assignments, Quizzes, Discussions, and Announcements
Each semester, you will need to update the due dates for any course Announcements, Assignments, Discussions, or Quizzes.
Announcements Dates
You can schedule your course Announcements to release on specific days over the semester.
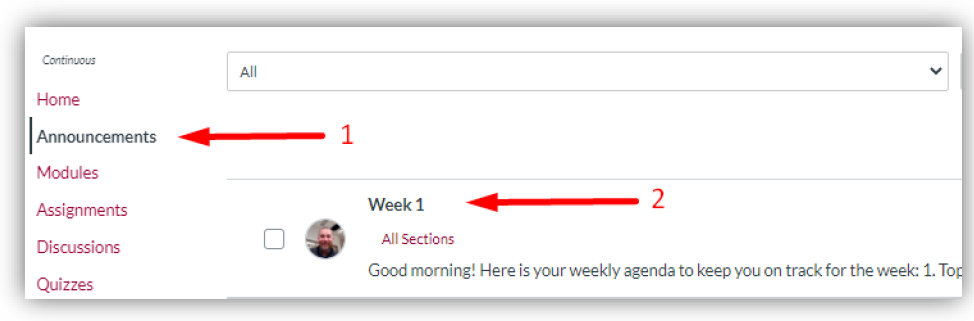
1. Navigate to the Announcements tool in the Course Navigation bar and click on the title of a specific announcement.
2. Select Edit in top right corner.
3. If not already selected, then select the Delay Posting check box under Options at the bottom of the page and then enter the date you want the Announcement released in the Post At field.
Assignments, Discussions, and Quizzes Dates
Note: Due dates appear in your students’ Calendar, To Do, and Coming Up tools. As these features help your students keep track of their course work and easily navigate to the submission pages, we recommend you use the Due dates feature in your courses.
Option 1: Change Due and Availability Dates
1. Navigate to the Assignments tool in the Course Navigation and click on the name of the
Assignment, Discussion, or Quiz
2. Select Edit in top right corner.
3. Scroll to the Assign section at the bottom of the page, select the students whom the dates will apply to under Assign to, and enter the Due and Availability dates. You can set separate due dates for specific students, groups, or sections by clicking +Add.

Option 2: Change Due dates in the Assignments tool.
1. Navigate to the Assignments tool in the Course Navigation.
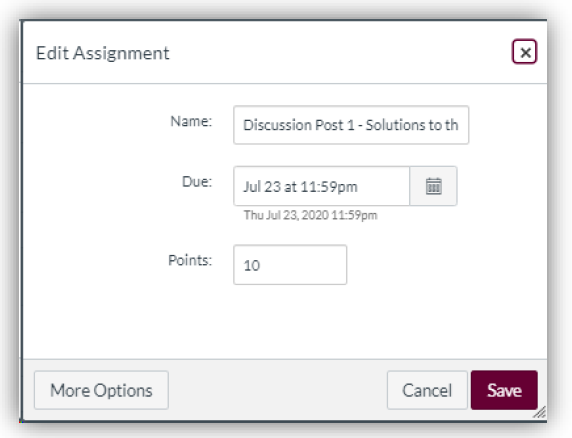
2. Click on the More Options menu (the three dots or ‘kebab’) on the right-hand side of the assessment and select Edit.
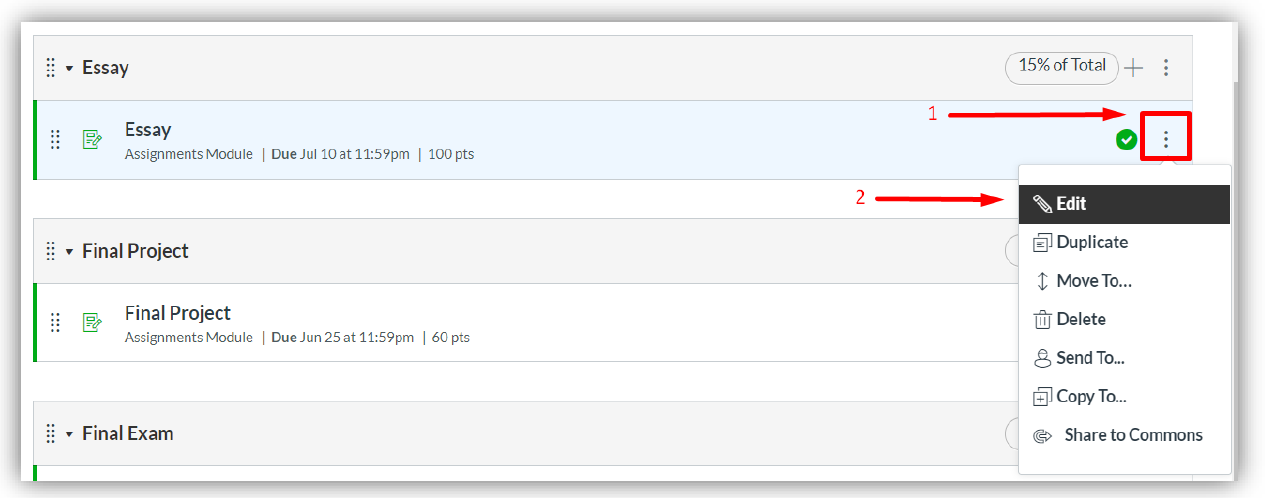
3. Enter the Due date in the pop-up window that appears.
Bulk Edit Assignment Dates
You also have the option to bulk edit the Due and Availability dates of your Assignments,
Discussions, and Quizzes. For detailed instructions, visit Canvas’s “How do I bulk update due dates and availability dates as an instructor?” document.
Adjust Events and Due Dates During Course Copy
You can adjust all course dates when you import the course content from the previous course shell. The dates are adjusted based upon the course start and end dates, with all dates moved forward to reflect the start date of the new semester. For detailed instructions, please visit Canvas’s, “How do I adjust events and due dates in a course import?” document.